
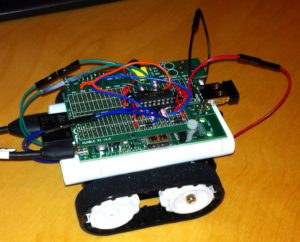
 My first big Raspberry Pi build was a robot. After a lot of research I found a useful article by Thomas Schoch. I opted to use the same Zumo chassis as it was small and had a built in battery compartment to power the motors, and used Thomas’ circuit diagram as the starting point for my own. My circuit was modified to remove the AND gates which restricted movements slightly (no curve turn, only spin) but reduced the circuit footprint on my prototyping board.
When I had to replace our heating controller I salvaged the push switched from the broken controller to create a set of buttons for the robot and amended the code to accept a list of instructions via 4 buttons: forward, reverse, left spin or right spin. The programmed list could then be played or cleared via another 2 buttons. I now had a Bee-Bot!
Using a set of AA batteries for the motor power and a USB power pack to power the Pi became a problem when I kept forgetting to recharge the power pack. It was also a little too large for my liking. After a bit more research I realised that the 4.8v output by my 4 rechargable AA batteries should be enough to power the model A and reworked my circuitry to power both the motors and the Pi from the chassis’ battery compartment.
To help our future robot overlords I decided I needed to create an autonomous mode and so added a proximity sensor and, again, amended the code so that the clear button also acted as a mode select allowing either autonomous roaming with collision detection, or programmable roaming to be selected.
Technologies: Raspberry Pi model A, python, soldering